Latest topics
» Mod Conference Room is Feeling Weakby V Wed Jun 09, 2021 10:52 am
» First post of 2017 ?!
by Celstrial Sat Nov 04, 2017 12:06 pm
» First Post of 2016?
by Payton Wed May 25, 2016 3:57 am
» Merry Xmas
by Altera Fri Dec 25, 2015 1:13 pm
» Your Awesome Pictures X
by Rage Thu Dec 17, 2015 2:57 am
» TR
by DigDog Tue Oct 27, 2015 7:07 am
» Wonderful Memories
by Mrsebi Mon Oct 12, 2015 10:06 pm
» Cool New Music
by Mrsebi Sat Oct 10, 2015 12:48 am
» Posting in these forums
by Mrsebi Sat Oct 10, 2015 12:40 am
Top posting users this week
| No user |
OUR DOMAIN IS ABOUT TO EXPIRE
Sun Apr 27, 2014 8:43 am by V
but I renewed it.
what have YOU done today, TR?
also I'm not sure if heartbleed effected us but you should probably not change your password, the jitterbug gang are working hard and they need …
what have YOU done today, TR?
also I'm not sure if heartbleed effected us but you should probably not change your password, the jitterbug gang are working hard and they need …
Comments: 30
Log in
Who is online?
In total there are 7 users online :: 0 Registered, 0 Hidden and 7 Guests None
Most users ever online was 427 on Fri Oct 04, 2024 2:47 am
Search
Zombified Tutorial!
+2
Aeonarial
Flaw of Insanity
6 posters
Page 1 of 1
 Zombified Tutorial!
Hey peoples! Your friendly explosive Artistic Madman here! I'm going to show you a cool trick in CS3 photoshop, MAYBE CS4 if I can get it to work as well as it should...
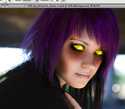
Step 1: Find a photo and open it in photoshop, I'm using a stock image I found on Deviant Art.

Step 2: Duplicate the layer, and find your dodge tool on your tool bar

Step 3: Use the dodge tool around the eyes (this can be a sloppy job right now)

Step 4: Go to Image/Adjustments/Variations (before I did this, if you are working with a very big image like I am, delete a lot of the stuff you don't need before hand - -)

Step 5: Choose whatever color you want the eyes to glow (for a zombie manner I recommend Red, White or Yellow)

Step 6: Erase everything BUT the eyes, be sure to do a REALLY good job here.

Step 7: Goto your background layer
Step 8: Use the sponge tool (under the same place as dodge, you have to hold down mouse button)
Step 9: Go over the skin, be sure to do as many coats as you think makes them look "dead".

Step 10: Use the burn tool (same place as sponge and dodge) (make sure range is Midtones) under the eyes, around the cheek bones and anywhere else you see fit.

Step 11 (optional): Change the burn tool's range to Shadows and go around the mouth, do enough coats and it looks like blood.

FINISHED!
Step 1: Find a photo and open it in photoshop, I'm using a stock image I found on Deviant Art.

Step 2: Duplicate the layer, and find your dodge tool on your tool bar

Step 3: Use the dodge tool around the eyes (this can be a sloppy job right now)

Step 4: Go to Image/Adjustments/Variations (before I did this, if you are working with a very big image like I am, delete a lot of the stuff you don't need before hand - -)

Step 5: Choose whatever color you want the eyes to glow (for a zombie manner I recommend Red, White or Yellow)

Step 6: Erase everything BUT the eyes, be sure to do a REALLY good job here.

Step 7: Goto your background layer
Step 8: Use the sponge tool (under the same place as dodge, you have to hold down mouse button)
Step 9: Go over the skin, be sure to do as many coats as you think makes them look "dead".

Step 10: Use the burn tool (same place as sponge and dodge) (make sure range is Midtones) under the eyes, around the cheek bones and anywhere else you see fit.

Step 11 (optional): Change the burn tool's range to Shadows and go around the mouth, do enough coats and it looks like blood.

FINISHED!
 Re: Zombified Tutorial!
Finally a tutorials section!!!! You should but the person in front of a wall and do blood splatter on the wall. It loos more real.

Aeonarial- Brother/Artist/Writer
- Zard :

Number of posts : 1549
User Points : 11592
Age : 31
Location : Atlanta, Georgia
 Re: Zombified Tutorial!
Great tutorial! My outcome is not as good as yours, but I'm happy with it xD
Zombie
Zombie

Gast- Guest
 Re: Zombified Tutorial!
Nice!
Also as a special step 12:
Use your midtones burn tool (very small brush) around the pupils
Also as a special step 12:
Use your midtones burn tool (very small brush) around the pupils
 Re: Zombified Tutorial!
Will this work with...*cough* CS2?

Cial- I am your mother
- Zard :

Number of posts : 3457
User Points : 142522
Age : 28
Location : A nice, padded room.
 Re: Zombified Tutorial!
Maybe
I'm not even 100% sure mine is CS3, I think it's just plain CS.
But you can try it out.
I'm not even 100% sure mine is CS3, I think it's just plain CS.
But you can try it out.
 Re: Zombified Tutorial!
An oldie one of my cousins had on his facebook page.


Cial- I am your mother
- Zard :

Number of posts : 3457
User Points : 142522
Age : 28
Location : A nice, padded room.
 Re: Zombified Tutorial!
I need help...
(Back on topic time)
(Back on topic time)

Cial- I am your mother
- Zard :

Number of posts : 3457
User Points : 142522
Age : 28
Location : A nice, padded room.
 Re: Zombified Tutorial!
Oh man, that is so awesome. I must try that sometime.

Shadow- this is a title
- Number of posts : 3430
User Points : 572274
Age : 29
Location : New Zealand
 Re: Zombified Tutorial!
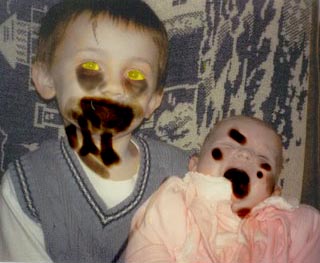
I know this one is bad, but it's too awesome-sauce to not be posted.

He'll be back alright... For blood. =P

He'll be back alright... For blood. =P

Guest- Guest
 Re: Zombified Tutorial!
I zombified Flaw!


Shadow- this is a title
- Number of posts : 3430
User Points : 572274
Age : 29
Location : New Zealand
 Similar topics
» [PHOTOSHOP] Light Burst Tutorial
» Basic Photoshop Tutorial [1]
» [Photoshop] Spriting Tutorial
» Sprite Positioning Tutorial
» [PHOTOSHOP] Pixel Character Tutorial
» Basic Photoshop Tutorial [1]
» [Photoshop] Spriting Tutorial
» Sprite Positioning Tutorial
» [PHOTOSHOP] Pixel Character Tutorial
Page 1 of 1
Permissions in this forum:
You cannot reply to topics in this forum![[TR] - Take Away Tom](https://2img.net/i/fa/empty.gif)


